


Soyjak Siege Online
Soyjak Siege is a meme-fueled roguelike survival shooter where Chud protects the Gem, dodges Soyjak waves, collects experience orbs, and builds around random upgrades.
Chud, the Gem, and the Swarm
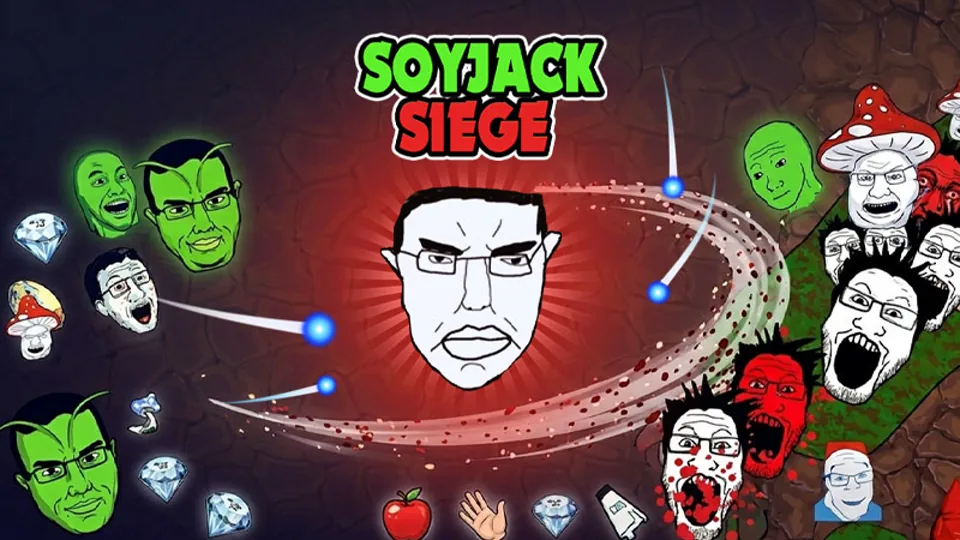
Soyjak Siege is a meme-styled arena survival shooter built around roguelike upgrades, bullet-hell movement, and steadily rising wave pressure. You control Chud in a top-down action run, defend the final remaining Gem, dodge Soyjak enemies coming from multiple directions, collect experience orbs from defeated enemies, and choose upgrades that decide how the run scales. The loud internet-humor wrapper is part of the identity, but the mechanical structure is closer to a compact survivor game than a joke-only novelty.
The Gem objective matters because it gives the chaos a fixed pressure point. You are not simply wandering until the timer ends; you are trying to keep enemy density away from the thing that must survive. That changes how movement works. If you kite too far without thinking, the swarm can collapse back onto the protected target. If you stay too close, the arena fills around you and removes your exits. Good runs happen when you use movement to pull enemies into manageable paths while still returning to defend the center of the fight.
That makes the Gem feel like a second health bar. Chud can survive a messy route and recover, but the run still collapses if enemies get too much time near the target. The best approach is controlled orbiting: pull the swarm away, carve a lane, collect enough experience to keep pace, then rotate back before the Gem becomes exposed.
The meme theme can make the first impression noisy, but the structure is serious enough to reward repeated attempts. Waves compress space from several directions, pickups tempt you into bad angles, and boss attacks punish panic movement. The humor gives the game its flavor; the survival math gives it replay value.
Movement Is the First Weapon
The loop is direct: survive a wave, defeat enemies, collect experience orbs, level up, choose a build option, then handle a more dangerous wave. Your attacks pressure the crowd, but movement keeps the run from ending. Some versions emphasize automatic attacks while you steer Chud through the arena, and some expose direct attack or interact input through the mouse. Movement is still the defensive layer in either case. Spend the first run learning how sharply Chud turns, how close enemies can get, and how quickly projectiles close gaps.
Controls are simple enough to learn quickly, but timing is not trivial. Movement may use WASD, arrow keys, or mouse direction depending on the build. Mouse input can handle aiming or menu choices, and Space can trigger a special action when one is available. A clean curve around a crowd is usually safer than a straight retreat into the arena edge.
The important skill is not chasing every drop. Experience orbs are necessary, but they are also bait when the arena is packed. If you cut through the middle for a few orbs and lose your exit, the next wave can trap you against the crowd or drag danger back to the Gem. The stronger route is usually a wide loop: pull enemies into a curve, create a narrow opening, pick up the safe orbs on the outside, then return before the objective is exposed. That rhythm turns collection into a planned route instead of a panic reaction.
Soyjak Siege also borrows from bullet-hell pressure. As waves intensify, survival depends on seeing lanes before they fully close. Projectiles and bodies both matter. A small opening near the outer edge may be safer than a straight path through the center, even if the center has more experience waiting. Boss encounters make that judgment stricter because a boss pattern can make greed instantly fatal. When a boss arrives, treat the first pattern cycle as information. Watch speed, spread, and timing before committing to close-range damage or a risky orb sweep.
Bosses interrupt the comfortable farming rhythm. A normal wave can be solved by circling and collecting. A boss asks whether your build can deal damage while moving, whether you saved enough defensive margin, and whether the Gem is protected while you dodge larger attacks. The first few seconds of a boss fight are for reading patterns before attacking aggressively.
Upgrade Economy Under Pressure
Upgrade choices define the shape of a run. Damage makes normal enemies die early enough to keep the arena breathable. Attack speed helps when small enemies appear from several angles and threaten to build a wall around you. Defense can save a run after one bad turn. Utility upgrades often matter most once the basic damage floor is solved, because movement, pickup reach, area control, or special effects can convert a shaky build into something that handles wave density cleanly.
The practical rule is to upgrade against the next bottleneck, not against a perfect theory build. If enemies survive too long, prioritize damage or fire rate. If you are getting clipped while turning, add defense or mobility. If experience is scattered in unsafe lanes, choose utility that lets you collect or clear space more efficiently. If boss pressure is the problem, take upgrades that keep damage consistent while you move, because standing still for burst damage is exactly what the later waves punish.
The Gem also changes upgrade value. Pure offense feels good when you are roaming freely, but if enemies are reaching the objective, area pressure and crowd control may be worth more than another small damage increase. A build that keeps the center clear can be stronger than one that only deletes enemies after they already surround the target. Think of every upgrade as a way to buy space: space around Chud, space around the Gem, or time before the next wave becomes unmanageable.
One useful build pattern is to solve three questions in order. Can normal enemies die before they form a wall? Can Chud survive one mistake during a dense wave? Can the build protect the Gem while you collect experience? Random upgrade choices will not always offer the exact answer, but this priority keeps the run from drifting into flashy picks that do not solve the current problem.
Weapon and passive combinations are where Soyjak Siege becomes more interesting. A small attack-speed increase can become much stronger when paired with an effect that hits multiple enemies. Area damage can protect the Gem even when Chud is moving away from it. Pickup improvements can turn unsafe experience clusters into safe level-ups. The value of an upgrade depends on what the build already does, not only on the number printed beside it.
Chud Runs Under Pressure
Soyjak Siege builds its identity from survivor-style escalation, bullet-hell dodging, meme energy, fast attempts, and roguelike upgrade choices. A bad run usually leaves a clear lesson: the orbs were chased too early, damage was skipped too long, Chud hugged the wall, the Gem was ignored, or a boss wave arrived without enough defensive margin.
The presentation is intentionally chaotic, and the action rewards quick movement over slow planning. The best attempts still demand route discipline, upgrade judgment, and awareness of how enemy pressure moves across the arena.
The core appeal is that every second asks for a small decision. Move now or collect? Defend the Gem or thin the swarm? Take damage or utility? Stay wide or cut through the center? Soyjak Siege is at its best when the arena looks ridiculous but the route decisions are serious.
Practical Run Discipline
Useful fundamentals:
For the first few attempts, judge success by how long you keep clean routes rather than how many upgrades you grab. Smooth movement creates the economy. Economy creates upgrades. Upgrades create damage. Damage protects the Gem. Break that chain by taking a greedy path too early and the run collapses quickly.
If the control scheme uses mouse movement, keep the cursor path smooth. If it uses keyboard movement, curve around the swarm instead of making hard straight-line escapes into the edge. Treat the outer ring as a temporary lane, not a permanent home.
Do not let experience orbs dictate the route. A delayed level-up is better than a dead run. After boss attacks, collect aggressively only after the dangerous pattern passes, then reset before the next wave closes. A living weak build can still grow; a greedy strong build ends before it proves anything.
A strong first objective is simple: survive long enough to understand the enemy curve. Watch when normal enemies overwhelm single-target damage, when projectiles limit routes, and when bosses force you away from the Gem. Once you know those breakpoints, upgrade choices stop feeling random.
Key Highlights
- Keep moving before the arena looks dangerous.
- Leave one side open as an escape route.
- Collect experience orbs when the path is safe, not when the screen is closing in.
- Take early damage or attack-speed upgrades so waves do not snowball.
- Add area pressure when enemies are reaching the Gem too often.
- Add survivability before boss phases if projectile density is rising.
- Learn boss movement patterns before playing aggressively.